Easy To Install Drip Irrigation System for Hanging Baskets
Every year we buy a couple of hanging
baskets to decorate our deck. They look great and as summer approaches they even
look better as the flowers spill out of the containers. The one problem we have
every year is keeping the baskets watered.
The worst time for watering is during our summer vacation when we are away
for a few weeks and it’s the hottest time of the year. When we are on vacation
we usually need to have a neighbor come over and water the baskets every day or
we take them to a friend’s house and they can water them here. Last year we
fixed this problem by installing an Orbit drip irrigation system that we
purchased at Home Depot.
The List of Drip Irrigation
Supplies We Purchased
For watering two hanging baskets we
purchased the following pieces:
-
1 Backflow Preventer
-
1 25 PSI Preset Pressure
Regulator
-
1 Orbit HT2 Sprinkler
Controller
-
1 House faucet to tubing
adapter
-
100 feet of ¼ inch tubing
-
1 Barbed Tee Connector
-
2 Adjustable Flow Mist Sprayer
-
2 Tie wraps
-
1 Package of ¼ inch clamps
What Do All of the Irrigation
Pieces Do?
-
Backflow Preventer
ensures that water will not flow back into your main water system.
-
Pressure Regulator
ensures the water pressure going into the sprinkler timer will be no greater
than 25 PSI. It will not increase the pressure to 25 PSI just reduce it to
25 PSI. This is a great protection device and I highly recommend getting
one.
-
Sprinkler Controller has the timing
mechanism that automatically starts and stops the flow of water to your
flowers and plants. We purchased a simple timer but you can purchase more
elaborate sprinkler controller with a lot more features, like LCD displays,
multiple zones and start times. To set up the Orbit Sprinkler Controller we
did the following: - Remove the waterproof cover - Set Dial B to “OFF” - Set
the interval on Dial A, we selected Daily - Set the duration on Dial B, we
selected 15 minutes You will want to play with the settings to determine the
best settings for your watering needs.
-
Faucet to Tubing Adapter converts the
tap style connector on the controller to work with the size of tubing you
are using.
-
¼" Drip Irrigation Tubing, Tee Connector
and Adjustable Mist Sprayer all deliver the water to your plants. The
tee connector allows you to add a second nozzle to the system. If you have
more than two baskets or planters you will need an additional tee connector
and nozzle for each additional plant you have.
-
¼" Clamps were used to attach the
tubing to the side of the deck and you may not need this for your system.
Here is a picture of the sprinkler controller with
the backflow preventer and pressure regulator attached to the tap:

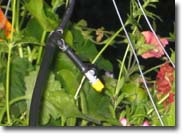
Here is a picture of the installed drip emitter in the hanging basket:
Determine the Watering Duration
Hanging baskets need a lot of water, especially when they are flowering and
it's hot outside. They should be watered at least once a day. To determine how
long to leave the timer on we ran the controller in manual mode and timed how
long it took to provide enough water. Once we new this time we programmed the
timer.
We programmed the timer to start in the morning when it wasn't to hot and
the water wouldn't evaporate. Also, any water that poured out of the baskets
onto the deck were tried by early afternoon.
For more information on different styles of tubing, please read this article
on different types of drip irrigation
tubing.
More Articles...
|